
Flue Pipe Reseal Prevents Fume Spills in Trophy Club
Key Takeaways About Flue Pipe Reseal
A flue pipe reseal restores a gas tight connection at vent joints to stop combustion gases from entering living spaces. This summary is for homeowners and property managers who need quick guidance after seeing smells soot or unusual appliance behavior.
- Identify rust damage loose screws and misaligned joints promptly.
- Prevent leaks by using high temperature gasket materials and cement.
- Avoid using low temperature caulk foil tape or improper sealants.
- Spot ongoing spills with smoke tests draft gauges and CO monitors.
- Reduce risk by documenting test results photos and written notes.
- Plan follow up inspections if odors soot or transient CO persist.
Introduction
A leaking flue joint can let combustion gases escape where they should not. That creates odor, soot, and a risk of carbon monoxide buildup inside the home. Homeowners often notice smells or black streaks before they see any visible gap in the pipe. In Trophy Club, TX properties a slow leak can go unnoticed until symptoms worsen.
Flue joint leaks usually come from movement, corrosion, or poor initial connections. Metal fatigue and thermal expansion cause joints to shift over time. Creosote or rust can prevent a tight fit and allow gases to escape. Southlake, TX homeowners sometimes report periodic smoking or backdrafting when joints fail.
Resealing a flue requires the right materials and a careful approach to keep combustion gases inside the vent system. A proper flue pipe reseal restores the mechanical connection and prevents spillage at joints. The wrong sealant or a sloppy job can leave gaps or block the flue entirely. Safety checks after reseal confirm the vent drafts correctly and that the appliance operates as intended.
Recognizing symptoms early reduces the chance of exposure to harmful fumes and costly repairs later. A technician will inspect the flue, test draft, and use visual and simple diagnostic tools to confirm a leak. If you smell exhaust, see soot, or notice unusual appliance behavior get professional help right away. After any work, insist on clear test results and a written safety check from the service provider.
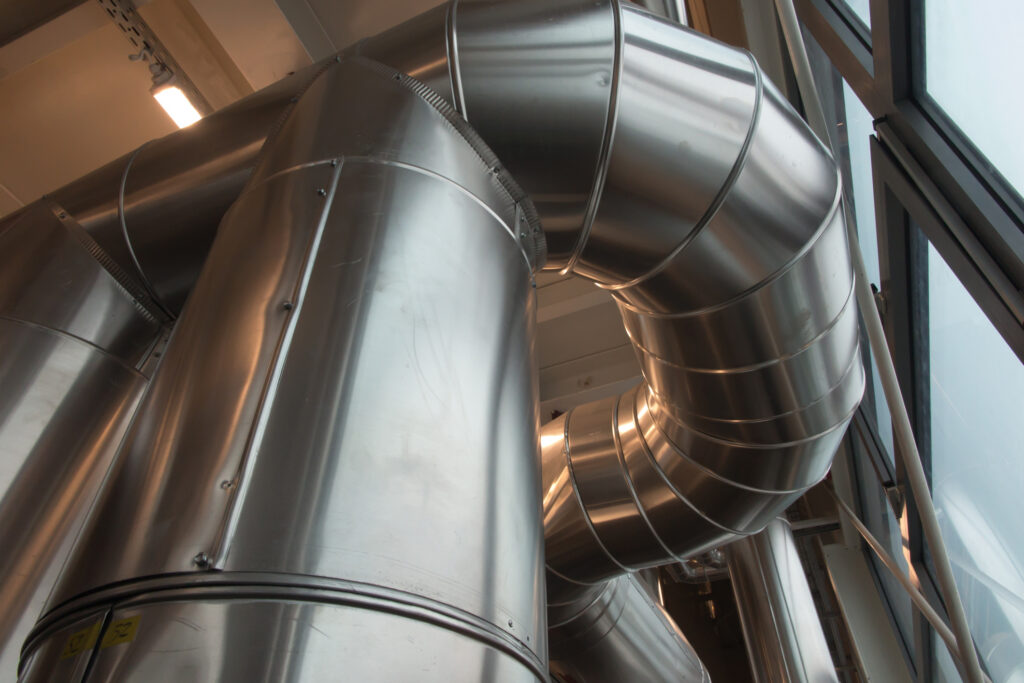
How Flue Joints Leak Why It Happens
How flue joints leak refers to gaps or failures at pipe connections that let combustion gases escape into the home. Small misalignments at seams create paths for warm, gas-laden air to exit the chimney or vent pipe. Vibration from the appliance and repeated heating cycles worsen small gaps until they become measurable leaks. Homeowners often ask whether a visible gap is required to have a leak, and the answer is no because microscopic gaps can still allow fumes to spill.
- Thermal expansion moves sections apart.
- Corrosion eats metal at the seam.
- Poorly seated male/female joints will not lock fully.
- Missing or degraded high-temperature sealant fails to stop leaks.
Joints rely on mechanical fit plus a high-temperature seal to stay gas-tight over time. When either part fails, pressure changes and stack effect force combustion gases out at the weakest point. A professional will look for rust, flue tile damage, and loosened screws during inspection to locate likely leak spots. Simple homeowner checks include looking for soot rings, smelling exhaust near the appliance, and observing unusual appliance cycling.
Diagnosis starts with a visual inspection, followed by basic tests such as a smoke test or draft reading at the appliance collar. Technicians may use a smoke pencil or incense to see air movement and a draft gauge for measurable pressure difference. Confirming a leak often requires checking adjacent joints and the chimney base, because gases can travel before exiting. After identifying the leak source, the right flue pipe reseal method depends on joint type and material to restore a gas-tight connection.
Common Causes Of Flue Joint Failures
Rust and corrosion at seams often cause joint failures by thinning metal and roughening surfaces that once sealed tightly. Fastener failures like missing screws, deformed clips, or stripped threads let sections shift and separate under vibration. In older installations, improper joint type can contribute when single-wall sections mate to double-wall or specialty connectors without adapters. Homeowners in Trophy Club, TX may notice intermittent odors or staining near these weakened connections before a full failure occurs.
Thermal cycling stresses sheets and causes work-hardening where repeated heating and cooling crack welds or seams. Movement from settling, roof flex, or unsecured vent straps allows joints to walk apart and misalign under their own weight. Deposits like soot, creosote, or scale build-up prevent full engagement between male and female ends, so mechanical seals never fully seat. For visible corrosion or heavy deposits a professional will mark suspect joints for closer inspection.
Poor initial installation choices often show up later as failures when installers use the wrong sealant or skip overlap requirements. Gum-type or low-temperature caulks degrade quickly and fail to resist flue temperatures, allowing gaps to form. Incorrect use of foil tape or non-rated mastics can trap moisture and accelerate corrosion at the seam. Technicians diagnosing this will inspect the joint type, sealant residue, and whether proper high-temperature cement or gasketing was originally applied.
Venting system layout problems also create failure points where excessive elbows, long horizontal runs, or back-to-back appliances reduce draft and increase condensation. High condensate encourages rust at low spots and around seams that collect moisture, weakening the joint. A smoke test or draft gauge reading helps confirm whether layout stress contributes to leakage during diagnosis. After locating likely failure spots, many professionals will cross-check the flue condition during a thorough heat exchanger inspection and safety review like the one described in the linked heat exchanger inspection resource.
Warning Signs Of Dangerous Fume Spills
A sudden sulfidic or exhaust-like smell inside the home that intensifies when an appliance runs often signals dangerous spillage. Visible soot accumulation around joints that appears new or spreads quickly is another serious cue homeowners should not ignore. Rapid yellowing or sooting of nearby surfaces near the appliance indicates hotter-than-normal combustion gases escaping from a seam. If occupants feel lightheaded, dizzy, or experience headaches when the appliance runs, treat this as a potential fume exposure and get fresh air immediately.
Persistent moisture or rust stains on ceiling or wall surfaces adjacent to the vent route can show that combustion products are condensing and leaking at a joint. Finding oily black streaks along the pipe or on vent collars suggests long-term spillage and inefficient venting that needs prompt correction. A strong backdraft feeling, where exhaust blows back into the room during startup, can signal a compromised path inside the flue system. Any unusual appliance cycling or premature shutdowns when the furnace or water heater runs should raise concern about spillage affecting safety controls.
Professionals confirm suspected spills with a smoke test at the appliance collar and a draft gauge reading to quantify negative pressure and leakage. Technicians also use a carbon monoxide detector while the unit runs and during flue testing to capture transient spikes that indicate exhaust entry. If a homeowner wants formal testing after repairs, consider professional carbon monoxide testing to verify safe operation and clearance standards. For information on professional testing options, see this carbon monoxide testing resource.
In Trophy Club, TX homes, acting fast when you notice these warning signs reduces exposure risks and property damage from soot and moisture. Southlake, TX residents who detect sudden smells or staining should ventilate the space and avoid using the appliance until a qualified technician inspects the vent. Never rely on visual inspection alone when symptoms include health effects or strong odors, call a technician to perform a controlled diagnostic and to recommend a proper flue pipe reseal if needed. A written report of the tests and findings helps homeowners track repairs and safety confirmations.

Proper Tools And Materials For Reseal
A successful flue pipe reseal starts with the right hand tools and measuring devices to confirm fit before applying sealant. Technicians use a tape measure, screwdriver set, and nut driver to check overlap and fastener condition. A draft gauge and smoke stick help verify flow and show where sealing is needed. Always have a camera or phone ready to document joint condition for a written report.
- High-temperature silicone sealant rated for vents.
- Preformed metal gasket strips for round and oval joints.
- Stainless steel sheet metal screws for securing joints.
- High-temperature furnace cement for masonry-to-metal transitions.
- Heat-resistant foil tape for temporary repositioning only.
Choose sealants and gaskets specifically marked for high temperatures and combustion gas exposure to avoid failure. A skilled tech inspects the male and female ends and removes rust or debris before installing a gasket or bead. They will use stainless steel screws spaced evenly and driven flush to keep sections aligned without distorting the pipe. For masonry connections, professionals use refractory cement to bridge gaps and maintain continuous draft.
Diagnostic tools confirm a good reseal after work finishes and before the appliance returns to service. The technician repeats a smoke test at the appliance collar and reads draft with a manometer to confirm negative pressure within safe limits. A portable carbon monoxide monitor records any transient spikes during startup and steady operation checks. Homeowners should receive test results and a copy of the inspection notes after sealing work completes.
Homeowners in Trophy Club, TX may notice improved odor control and fewer soot streaks when a proper materials list is used. Southlake, TX residents should ensure the contractor documents materials and testing steps on the job report. If any of the listed tools or materials are missing during a repair, ask the technician to explain their alternative method. When in doubt about safety or test results, consider scheduling a formal HVAC safety inspection with an independent provider.
Step By Step Flue Pipe Reseal Process
Begin by turning off the appliance and shutting off the fuel or power supply according to manufacturer instructions before any work begins. Next, remove the fasteners holding the suspect joint and gently separate the male and female ends to inspect fit and seating. Clean both mating surfaces with a wire brush and shop rag until visible rust, soot, and degraded sealant are removed for a proper mechanical fit. Measure the overlap and check for dents or distortions that prevent full engagement before deciding on gasket or cement placement.
Fit a temperature-rated gasket or apply a continuous bead of high-temperature silicone to the female end, ensuring the bead thickness matches the joint type and manufacturer recommendations. Slide the sections together while keeping them aligned so the gasket compresses evenly and the male end seats into the female socket fully. Drive stainless steel sheet metal screws in a staggered pattern while avoiding over-torquing, which can deform thin sections and create new leak paths. Recheck overlap and fastener tightness after setting to confirm the mechanical joint holds without gaps.
For transitions to masonry or different materials, pack refractory furnace cement into the gap with a trowel to form a continuous, heat-resistant seal that bridges the surfaces. Smooth the cement so it contacts both materials fully and allow the recommended cure time before any appliance testing or operation. Temporarily install a smoke source at the appliance collar to watch for leakage during the first low-fire cycle while observing the newly sealed joint. If smoke shows any movement outward, reopen the joint to correct the seal or add more gasket material as needed.
After the sealant cures, run a draft test with a manometer to confirm negative pressure at the appliance collar under normal and startup conditions for reliable results. Use a portable carbon monoxide monitor near the appliance to detect any transient spikes during the same tests and record readings for the homeowner. Document the work with before-and-after photos and written notes describing materials used and test outputs for future reference or warranty needs. Homeowners in Trophy Club, TX should keep this documentation and consider scheduling a follow-up inspection if symptoms return.
If horizontal runs or nearby elbows remain suspect, partially reassemble adjacent joints and perform the same sealing steps to prevent downstream leaks from shifting pressure or condensate. Check for proper vent slope and strap support while the system is open, correcting any sagging sections before final fasteners are installed. Perform a final operational test with the appliance running through several cycles to ensure stability and no soot accumulation near the repaired area. Southlake, TX residents who notice recurring odor after these steps should contact a qualified technician for a comprehensive venting evaluation.
Safety Checks After Reseal And What To Test
After a flue pipe reseal, start with a controlled combustion test to confirm proper draft and no visible spillage at the repaired joint. Run the appliance through a normal startup and observe the collar area with a smoke source or smoke pencil to watch for outward movement. Measure draft with a manometer at the appliance collar during steady operation and record the reading for the homeowner file. If readings change significantly between startup and steady state, pause and recheck seal integrity and fastener tightness.
Next, use a portable carbon monoxide monitor placed near the appliance and return registers to check for transient spikes during cycling and steady operation. Verify CO readings stay below safe practical thresholds and that no short-term elevations occur during ignition or shutdown. Inspect surrounding surfaces for new soot, staining, or warm spots that signal incomplete sealing or flow disturbance. If any CO or visible signs reappear, recommend keeping the appliance off and scheduling a professional follow-up inspection immediately.
Confirm mechanical security by re-torquing stainless steel screws and checking strap supports and overlap after the system has cycled and cooled once. Look for any compression set in gaskets or bead displacement that indicates rework is needed before final sign-off. Photograph the finished joint and include draft and CO readings on the job notes for homeowner records and future comparisons. For homeowners who want guidance on service transparency and documentation, consult helpful service qualities guidance before accepting test reports.
Perform a short ventilation check by opening nearby doors or windows briefly and noting whether draft behavior changes, which can reveal pressure interactions with the building envelope. Check appliance combustion components like burners and the heat exchanger visually for soot patterns that could point to remaining venting problems. Offer the homeowner clear written test results and recommended next steps if any abnormal readings occurred during testing. In Trophy Club, TX and Southlake, TX properties, insist on a written safety checklist and recorded measurements before returning the appliance to normal use.
When Homeowners Should Call A Professional
If you detect persistent odors, repeated soot after a reseal, or any symptoms that suggest residual spillage, call a professional promptly. A trained technician can perform a controlled diagnostic that goes beyond homeowner checks and reduces exposure risk. Do not run the appliance if occupants experience dizziness or headaches until a professional inspects the venting. In Trophy Club, TX homes, rapid response helps limit indoor air quality impacts and property staining.
- Unusual soot appearing after repairs requires inspection.
- Intermittent backdrafting needs a combustion and draft test.
- Transient carbon monoxide readings require immediate professional attention.
- Visible corrosion or damaged joints call for a qualified reseal.
If you notice draft readings that swing widely between startup and steady state, schedule a service visit for further evaluation. A technician will use a manometer, smoke stick, and CO monitor to confirm whether the reseal held under operational loads. They also check adjacent joints, strap supports, and overlap to rule out hidden leak sources that mimic the original symptom. Southlake, TX homeowners should document symptoms and testing results for the service appointment.
Call a professional when you lack the tools, access, or experience to work safely on venting systems under fuel or electrical shutoff. Professionals follow safety protocols, confirm proper gasket and cement materials, and provide written test results you can keep for records. If the problem involves masonry transitions or deteriorated sections, a technician can recommend replacement rather than repeated patching. Before hiring, review the provider’s written safety checklist and testing documentation to ensure transparency and accountability.
Preventive Maintenance To Avoid Future Leaks
Schedule periodic visual checks of vent straps, overlap, and visible sealant to catch early loosening before leaks develop. Tighten loose sheet metal screws and correct sagging sections to keep joints from walking apart under heat cycles. Inspect gasket compression and look for bead shrinkage or cracking that indicates reseal materials aging out. Keep a simple photo log of joint conditions to compare over time and spot gradual deterioration early.
Clean soot and creosote deposits from accessible sections to improve seating and reduce corrosive buildup that shortens joint life. Use a wire brush and shop rag during cool periods and avoid scraping with tools that dent the pipe. Verify adjacent elbows and horizontal runs remain sloped and supported so condensate does not accumulate at seams. If you see active rust or pitting, plan for replacement rather than repeated reseals to restore long-term integrity.
After maintenance, always perform a quick smoke check at the appliance collar to confirm no visible leakage during startup and steady operation. Use a manometer reading to establish a baseline draft value you can compare on future inspections for early detection of changes. Keep recorded draft and CO readings in your service notes to help technicians diagnose trends if symptoms return. Homeowners in Trophy Club, TX should keep these records and present them during follow-up visits for faster troubleshooting.
Consider scheduling annual professional vent inspections when appliances receive routine service to catch hidden problems before they spill fumes. A technician will inspect heat exchanger condition, verify flue sizing, and check for effects from nearby combustion appliances that disrupt draft. For guidance on sizing and matching an appliance to your home ventilation needs, review the furnace selection advice in this helpful resource about choosing the right furnace. Southlake, TX properties with complex vent layouts benefit most from documented inspections and measured baselines to reduce future reseal needs.

Frequently Asked Questions
What causes a flue joint to start leaking gases?
Flue joints can loosen from metal fatigue, thermal expansion and contraction, or mechanical vibration over many heating cycles. Corrosion or rust eats away flange surfaces and gasket materials, creating gaps that let combustion gases escape. Poor initial alignment, improper fasteners, or missing sealant also cause leaks that a proper flue pipe reseal can fix. If you smell exhaust or suspect a leak, stop appliance use and call a professional because carbon monoxide risk is serious.
How does a professional confirm a flue pipe reseal worked?
After a flue pipe reseal, a technician inspects all joints visually for intact sealant and correct joint seating.
They run the appliance and use a combustion analyzer to check CO, O2, and draft readings at the flue.
A smoke or gas leak test highlights any remaining leaks while a pressure gauge confirms proper draft under operating load.
If readings remain abnormal or CO appears, stop use immediately and call a professional for further repair and safety checks.
What signs indicate a resealed flue still spills fumes?
You may notice persistent soot buildup or new dark streaks near flue joints after a flue pipe reseal, indicating ongoing leakage. Homeowners often report a lingering rotten egg or stale exhaust smell indoors, especially near vents or the appliance room. A sustained rise in carbon monoxide alarm readings or visible smoke backdraft into the room signals a serious safety hazard. If you observe these signs, stop using the appliance and call a qualified professional immediately for inspection and testing.
Which materials and tools are used for a proper reseal?
For a proper flue pipe reseal technicians commonly use high-temperature stove cement or rated furnace cement to form an airtight joint. They pair cement with high-temperature foil tape or metal-backed flame-resistant gasket material at slip joints. Tools include wire brushes, flashlights, basic hand tools, sheet-metal snips, and a small caulking gun for controlled application. If you smell combustion gases or lack confidence, stop work and hire a professional because this involves carbon monoxide risk.
When should Trophy Club homeowners call for follow-up testing?
Schedule follow-up testing within 24 to 72 hours after a flue pipe reseal if you smell exhaust or notice soot near vents.